
This concept can be extended to the off-camera strobe world, but not so much to control bokeh, but light. This time, instead of just controlling shutter speed, ISO and aperture, we add another ingredient to the mix, and that is light intensity via off camera strobe.
By controlling this trio of parameters (ISO, aperture and shutter speed), we control the depth of field, but if we add the control light intensity, we easily control the depth of field of the picture, though not with bokeh... but background lightness and darkness.
Allow me to demonstrate with a very basic example:
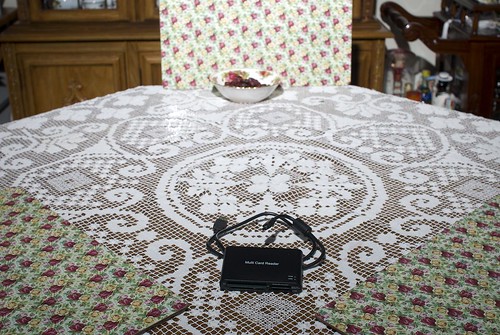
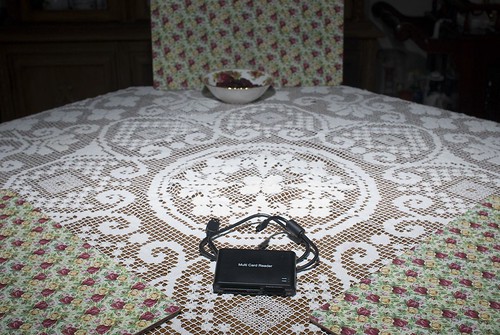
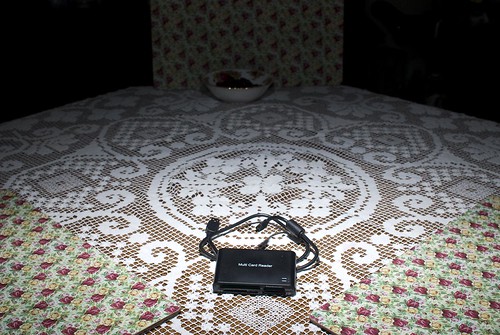

If I wanted to complete the exercise, I would have taken yet one more picture with flash intensity increased to 1/4th output and the bowl in the background would have been hidden in darkness, but I think the point has been made, right? We have just demonstrated how to use a strobe to control our visible depth of field.
"But Jerry, if I keep increasing flash, don't I just blow out the picture?"
Yes you would for sure, but here is the key... aperture. Decrease the aperture size (numerically increase it), each time you increase the flash power in even amounts.
In more simple terms, if you want to do it the "easier" way... set camera to manual and set exposure settings so that the scene is severely underexposed or black. Control the flash (small snoot could help if the object is small), get the flash CLOSE and starting from a very low power settings, increase it until you get the effect you want. This will do the same effect, but doing it my way in the example helps you understand things better. Another way is shutter speed. Shutter speed controls the amount of ambient coming into the shot, but if even at your maximum sync speed, you cannot get the effect you want... underexpose everything with a small aperture and raise the area you want exposed properly, by flash.
Ok, so in what ways could this info be used? Easy, let me give you a great example. Let's say you have a picture to take in the house, it's evening, and your home ambient lighting is barely ok but not enough to get the shot that you want. We can use a camera mounted flash and get the picture, yes? Yes, you can, but how will it look? Filled with strong shadows and with very bright well exposed and FLAT appearing subjects.
What if you wanted to take a picture of a complete room? Why not lower shutter speed a little, increase ISO a little and then slowly start adding some small amounts of broad, white, diffused light into the room (usually bounced for best effect) until you get the amount of light needed. You will likely be surprised at how little light is needed to get that shot. Without the flash, what will it look like? Well, without flash, it will be dark (lol). Ok, what if I raise ISO? At high too high an ISO, it will look too grainy.
Solution? Set ISO to lower levels (around 200-400?), and add a little flash to the room to raise it to just the minimum that you need to get the wide expanse of the well lit room... but do NOT raise your shutter speed to 1/250th, set it to something between 1/60th to 1/125th. By keeping your shutter speed relatively slow, you get a well lit subject and a slow enough shutter speed to capture the local ambeint light as well. Like this, you get a very natural picture PLUS you can use a smaller aperture for greater visual DOF!
How about the inverse? Now we want to highlight the subject, but not show that ugly painting on the wall behind them, perhaps? Of course we could use bokeh and blur it out, but what would be even better is get the light source closer and crank up the power of the strobe much more. This means that we will need to increase shutter speed (to our max sync speed), and/or decrease aperture (higher numerically!), and the effect is that we will get a darker background (you will likely need to very strategically aim the flash more at the subject instead of bouncing in this case!), the effect would be hiding that horrid painting from being in the picture (ok, maybe its not that horried, but we want a way to lessen it's distracting presence in the picture). This is a great way to do just that!
Another example... where have we seen these ideas effectively used in concepts in manners that are familiar to us? How many of you have taken a picture of a strong light source behind our subjects? Many, I bet. What was the effect? A silhouette... or if your settings were "off" a little, a subject that was close to being hidden in shadow and poorly visible. If one took that same scenario, and lit the subjects via an off camera flash aimed and poweed to expose the subjects properly, we would have a well lit background (thanks to the seting sun in the background), and subjects that are clearly visible (thanks to our flash).
The concepts of using bokeh to hide the background or increased intensities of light sources and smaller apertures may initially be a little confusing, but with a little practice, you have just added another tool to your tool box, and as we know... variety is the spice of life!
Using differing ratios of brightness to light our subject from side to side or front to rear, or anything in between, will give us different results. Many of these results have been used since photography first started and given names like "Rembrant", "Butterfly" and "Open Loop". In our next section, we will take a look at a few of these "standard" or established lighting methods and see how they work, and what the effects are on our "model".