The problem when using Nikon's version of it (CLS), is that distances are greatly diminished as shutter speeds go up above 1/250th and you must use only Nikon flashes.
Well, there is a way around this and a workaround at the strobist club has been around for a while, but I never tested it before and I would like to share my findings of it.
I was recently playing with a remote Nikon SB-600, Metz C-45, Vivitar 285HV, a low end studio strobe and the Profoto Compact 600s at the maximum shutter speeds of my D700... 1/8000th and syncing the camera to these off camera remote flashes so easily it was almost anti-climactic.
Before I move on, I wanted to metion that I tried doing this before with the Cactus V2s and it did not work well, but it works incredibly well with Pocket Wizard II's. It may or may not work with other triggers, I have no way of testing it out.
How it works:
Basically you fool your camera into using FP High speed sync by being in manual, shutter or aperture priority mode. I played in full manual mode for my tests.
The setup is done in 3 parts;
- the part to setup the remote flash
- the part to setup the on camera flash
- the setup done in the menu system of the camera and flash
How to do the setup:
Part 1 - The Remote Flash
Let's start with the remote light source. Let me state that this flash can be any brand or type of light source that can give us a flash duration of 1/8000th of a second or longer. This means items like a Vivitar 285 or even a studio strobe will all work. In my blog entry here, we'll be going to be working with a Nikon SB-600 set to full manual and wireless disabled, for the sake of convenience.
Since the SB-600 doesn't have a sync port, I needed a hot shoe adapter with an integrated sync port. This little adapter lets me use any flash and activate it via the sync port built into it. First, install the flash on our hot shoe adapter.
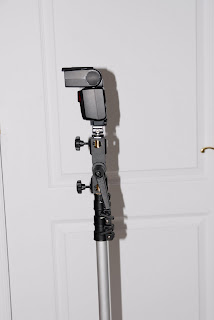
Now, to trigger the remote light source, we must use Pocket Wizard transceivers. This is important, as other transceivers may or may not work, but the PW's will always work. I can tell you that the Cactus V2s units are too slow and will not work.
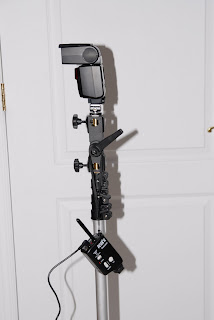
Next, plug the sync wire into the FLASH socket on the PW and the other end of this into the sync connector of the hot shoe adapter and turn on your PW.
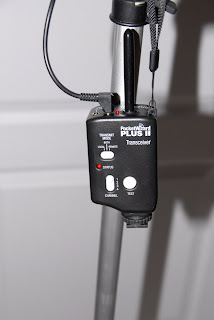
The next part is important... set your remote light source to full power. The higher the power level, the longer the flash duration will be and we need a minimum of 1/8000th flash duration for this to work. If you set your flash to a lower power level, it may not work... it all depends on your light source.
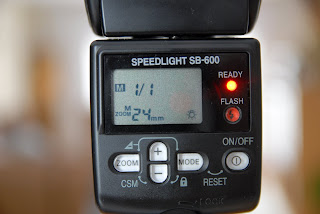
I know that I do not need to mention it, but don't forget to turn on your Pocket Wizard and note what channel it is set to. I tested mine on channel 1 for this exercise, but I am sure any of the 4 channels would have worked. Also do not forget to DISABLE the wireless option on the SB-600 and set it to full power. At this point, you could slide off that SB-600 and replace it with a Metz at full power, the Vivitar 285HV, or a studio strobe also at full power, and all will work.
That is it for this part, the remote flash is ready.
Part 2 - The Camera Hardware Setup
On the camera, place a SB-800 or SB-900 on to the camera's hot shoe, again this is important. The reason is becuase you want to fool the camera into full iTTL mode and it has to be a SB-600, SB-800 or SB-900. You will see why in a few seconds, please read on.
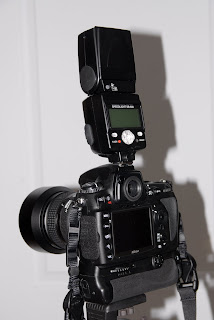
Part 3 - The On Camera Flash and Camera Menu System Setup
You will want to transfer all lighting control from the camera to the flash with the SB-800 or SB-900. To do this, you configure the flash to become the MASTER. To do that, press and hold the SEL button for 2 seconds until it comes to the main menu, navigate to the wireless control menu and select the MASTER option from the list.

Hit the power on/off switch to exit this mode and you get the menu below. In this menu, as you can see, I have already modified the setup so that the on camera flash is in iTTL mode and with a -1/3rd EV setting.

If you do not want the on-camera flash to contribute any light, activate commander mode and change the settings so that it shows two bars for the Built-In flash (like group C is displaying now). You may also, from here, change settings for any additional iTTL Nikon flashes that are in either group A (iTTL at 0 EV adjustment) or B (which is set to totally manual and 1/32nd power), to your preferences.
If you are using an SB-600, place it on camera, set it to a manual mode and set it to 1/64th power.
Next we must make sure is that we have Focal Plane sync activated and you do that by going to the flash sync speed sub-menu and selecting either 1/250th Auto FP or 1/320th Auto FP. I've found best results when the setting is at 1/250th. Your off camera flash specifications will tell/show you which work best for you.
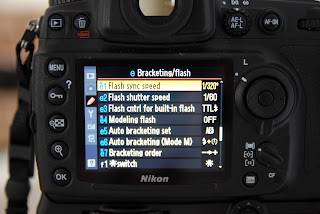
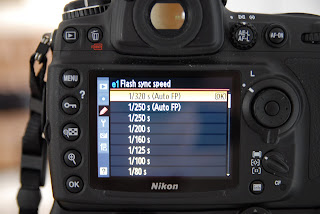
We're almost done!
To tie it all together, we secure a Pocket Wizard to the on-camera external flash. Now, for the sake of this blog entry, I used a rubber band, but please use something more secure like industrial grade velcro. We don't want you dropping and possibly damaging a Pocket Wizard.
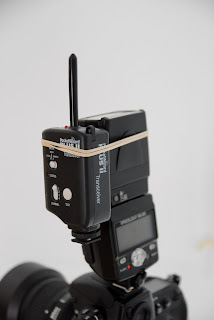
On the PW, plug the wire into the CAMERA/FLASH socket.
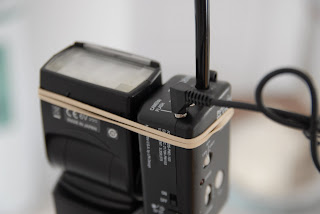
...and this part is very important and one of the main reasons this can all work at all... at the other end of the wire coming out of the Pocket Wizard, plug the sync connector into the sync port of the external flash that is mounted on the camera, or the camera's sync port. Now you know why we needed the SB-800 or SB-900 (the on flash sync port).
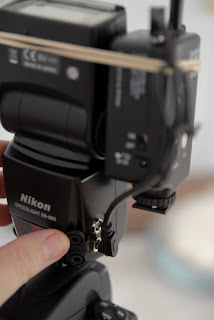
Turn on your pocket wizard and you are ready!
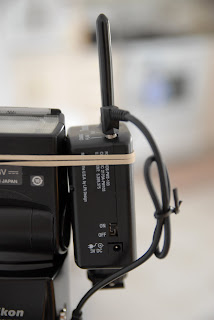
So, does it work?
Yes, it sure does! In theory, we could control 5 groups of lighting:
1. the on camera flash
2. Nikon CLS group A
3. Nikon CLS group B
4. Nikon CLS group C
5. All the off camera lights activated by the pocket wizards
Again, in theory, we could go even further by adding more lighting and setting them to different channels on the PWs and switching the channel to the matching channel on our on camera PW. In this manner, we could conceivably set up as many as 4 sets of lighting in different rooms (or different parts of the same room), and change channels based on what room we are in (or what part of a single room we are in).
Here are a few examples with included EXIF data left in the pictures should you be curious for additional verification. The pictures are not all that exciting, but they are there to prove a technical point, not win a photo contest:
Let's skip 1/250th, we know it would work without any special efforts.
1/500th - F16 - ISO 100
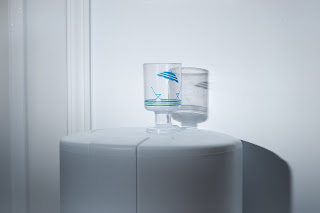
1/1000th - F16 - ISO 200
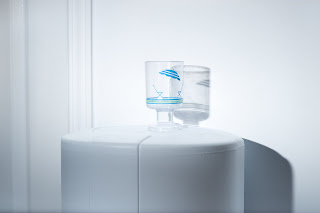
Another supporting picture using a Vivitar 285HV:
Supporting EXIF info:
More EXIF detail about the above picture
More EXIF detail about the above picture
So, what happens when you cut down the power of the flash? Well, the technique doesn't work very well at the lower the flash power becomes, and you start getting some blackened parts of the pictures, like thus thanks to a flash duration greater than shutter speed:
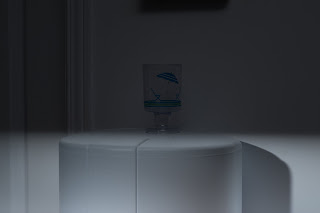
Not very pretty. So, does that mean that this whole exercises was useless? What can we use this for if it only works in one narrow field as demonstrated? Well obviously, this is the perfect tool for being able to light your subjects on the brightest of days and still be able to control the light. Also by increasing shutter speed, we can increase the aperture and control the depth of field on sunny days, something not normally possible unless you screwed on several ND filters over your lens (which would decrease your picture quality, by the way).
Another advantage is that because you are using Pocket Wizards, distance is not an issue... so you can be high-speed syncing and be standing as far away from the lights that the PWs care to trigger the lights for you... which is pretty darn far!
A third advantage seems to be that you can squeeze more light or distance from light using this technique instead of CLS. A disadvantage of this method is that since it is not CLS, obviously there is no iTTL automatically metering things for you, so you will use the histograms on the camera or your flash meter.
A fourth advantage is that you could mix and match iTTL and non-TTL flashes and all work harmoniously. Meaning... I could place a studio strobe in the background, have two iTTL Nikon flashes on the side and a fourth battery powered flash as a hairlight in such a manner that the 2 Nikon lights are in TTL mode and the 2 other lights are not in TTL mode and all work harmoniously and all trigger at the same contributing to the scene.
A very nice addition to the tool kit!
May 27, 2009 - Addendum
As you can see from above, using speedlights, lower end studio strobes or even a Profoto Compact 600 unit, all can sync at anywhere between 1/250th to 1/8000th, but the light source has to be set to full power. If not, only about a half of the frame gets exposed. Well, I tried the same tests out on my newest recent acquisition, the Photogenic PL2500DR and had a surprise that put a huge smile on my face. The PL2500DR syncs up not only at any speed... but at any power setting! That's right... from it's lowest setting of 31 W/s, all the way up to the full 1000 W/s! The choice of triggers that I use is the PocketWizard Plus II. I did not purchase the Photogenic PLR2500DR with the integrated PocketWizard support because at the time I was not decided or dedicated to any specific system (so I cannot tell you how that unit works).
This means that with this light, I can use ANY speed setting at ANY power setting and be 100% synced with the camera... this is a huge creative tool and not something that I was able to do with any other light source, not even the Profoto Compact 600s. The main reason the 2500DR light works so well is it has a very fast ramp up speed and a relatively slow flash duration.
The shots below are straight out of my D200 camera (yeah, I shot in JPG Fine), and the only post processing was a resize. Quality of final result is not important in this case, just that one can see if the frame is in sync completely or not... which they are in all of the shots shown here.
The main thing that could not be done is use a power setting on the light source other than full power. Here we see that now, with this light source, I can.
First test, lets set the flash power to it's lowest setting of 31 W/s and take shots at different shutter speeds. Let's skip 1/250th as we know it will work (this is my camera's default sync speed), and start from 1/8000th and move down to the slower 1/320th:
Shutter speed of 1/8000th

The flash was in sync each time.
Second test, let's set the shutter speed to 1/8000th and see what we see at different power level settings on the studio strobe:
Power set to 1000 W/s
 In all the pics above, it is easy to see that the flash is visible, hence in sync at different power levels. This is something that none of the other flashes could do! Traditionally, the instant the power was lowered on the light sources, 1/2 of the frame or more was lost to underexposure, and this is just not happening when using this light.
Oh, one final point... I was able to do all the pics above with the Pocket Wizard II plugged into the sync port of the D200 and D700, not the SB-800! However, the "trick" would not work unless the SB-800 was in the hotshoe, turned on and showed FP as one of the options on the flash. You can then set the power to 1/128 which means that your light minimizes it's contribution to the scene.
A couple more shots of what overpowering the sun can do:
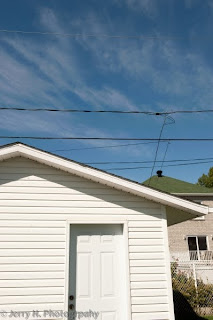
Ambient settings are F/16, 1/250th at ISO 200.
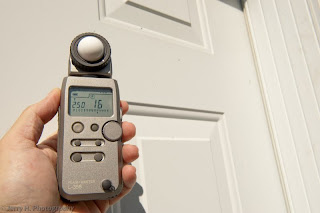
A fast shot of the shed and sky shows a straight ambient shot.
What I did was place the 2500DR 14 feet from the door, and placed a gridspot on it so we could localize the lighting. Then I jacked it up to full power, and look at the colour of the sky now... instantly its so dark, we cannot even see the clouds anymore!
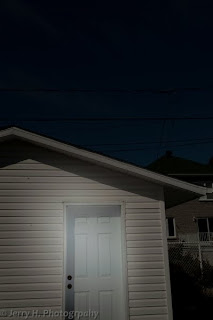
I placed a grid spot on the 2500DR so that one can more easily see the area lit by the strobe.
I love this light and I love this setup!!
February 23, 2011 - Addendum
Well the internet debates continue... do you go multiple speedlights or one big studio head? Do you go one FAST studio head or do you go one SLOW studio head? I am still kinda sticking to my guns that "slow is the way to go". Why? Because of the Pocketwizard products, specifically, the Plus II and ControlTL setups.
Way up above in this post, I show you how to do it with the PW Plus II setup. For the people who are Nikon users, they are lucky... they can do this very effectively. Canon users can do it too, but for some reason, they lose 2-3 or more stops of light when you move over from their max sync speeds up one stop higher. Let's take a look at what makes it so nice for us Nikon users (mind you I don't have any Canon equipment myself, so I cannot test it myself, but only base my words on the experiences of other Canon users and what they have shown me) and how we can perhaps even increase the overall effectiveness.
First a small review. Today I took a shot of my living room during the day. Ambient light outside zeroed out my D700 camera meter at 1/250th, F/16 and ISO 200. I then used the Photogenic 2500DR studio head and set it to 1/125th and kept raising power until the strong beam of light was no longer visible on the chair, meaning that the light streaming in from outside disappeared. That meant that the light had an exposure level of *at least* F/16, 1/250th @ ISO 200. This then became our base exposure and the histogram from which we would compare the following shots with. The power level on the flash head ended up being set to 500W/s or half power.
I then did 2 rounds of shots at 1/250th, 1/500th, 1/1000th, 1/2000th, 1/4000th and 1/8000th of a second shutter speeds. I paid particular attention to the step from 1/250th to 1/500th. This is a jump of exactly 1 full stop. I would open the aperture 1 full stop and any amount more that I would need to open up would be the amount of light lost due to inefficiency of the sync timing process.
When the Plus II units were used, the timing info came straight from the camera (using the Nikon High Speed Hack trick, which fooled the camera into HS PF mode because of the Nikon flash in the hot shoe). This timing info was very accurately set to trigger flashes in relation to shutter speeds way above 1/250th, and when used in conjunction with a slow but powerful studio head like a Photogenic 2500DR, the results were very impressive. There was a meager single full stop of light initially lost in the jump from 1/250th to 1/500th, but going from 1/500th to 1/1000th, the result was a slight overexposure that required a drop of 1/3rd of a stop to regain equal exposure levels to the histogram of the photo taken at 1/250th. From that point on up to the maximum shutter speed, every increase in 1 stop necessitated an exact 1 stop opening of the aperture to retain the exposure settings.
Fast forward to 2011 and the release of the Pocketwizard ControlTL units for Nikon. Using a FlexTT5 as the receiver on the remote 2500DR studio head and either a FlexTT5 or a MiniTT1 in the camera hotshoe, we right then and there fool the camera into thinking there is a Nikon flash on board, and it is fooled into falling into HSFP mode, so the first advantage is that we don't need a heavy flash to sit on the camera... thats a good start! But how will the PW's fair with these new units?
Initially, not too well. I measured a loss of around 2.5 stops compared to the Plus II units using nothing but factory settings. After a firmware update, I decided to try again, and interestingly enough, saw some big improvements... enough that I would want to try them out again.
The following shots are the results of my latest very unscientific test. The flash power was set to 1/2 and NEVER changed in any of the shots. The only modification done to the ControlTL units was a change of offset to minimize any black lines at the bottom of the shot. No photos were cropped, they are presented in their 100% original form... heck, these are screen captures as they originally appeared in my Lightroom application after being imported. With this it is easy to see the photo, histogram and camera settings all at the same time.
Here is our base shot of the room at F/16, 1/250th and ISO 200:
Jump to 1/500th and open up the aperture to F/11 (one stop each way) and there is an obvious increase in brightness!
Let's change nothing except the aperture, closing it down to F/13, that chair is looking a little too hot.:
Jump up to 1/1000th and F/9 and it is a perfect 1 stop difference:
Now up to 1/2000th and F/6.3 and again a perfect 1 stop decrease:
Now to 1/4000th and F/4.5 is once again a perfect 1 stop difference:
And finally to 1/8000th and F3.2 is the final and again perfect 1 stop increase:
The photos above, but larger and in the same order:
Some thoughts:
- So, how can you go UP in brightness, jumping from 1/250th to 1/500th of a second? Should it not be going down? Yes it should be going down... unless the timing is more conducive to having that shutter open during a brighter part of the flash event. It's all about where it hits in the curve.
- Ok so is that shot at 1/250th less powerful with the Flex than on a PW or even in slaved mode? No, they are identical... I did the tests right after to see if something was wrong because that increase from 1/250th to 1/500th surprised me... it wasn't and those shots were all the same.
- So what is the sacrifice? Perfect linearity of the exposure from top to the bottom. There is a slight gradation of the light at the top the more that you raise shutter speeds.
- Can you do something about that? Yes. I can adjust the offset via the Pocketwizard software, so that the shot is perfectly linear from top to bottom, but I will lose about a 1/2 stop in the exposure because I would be shifting the sync to a part of the flash event that is less powerful but more linear.
- How would I use it in real life? I'd take that 1/2 stop more, and thank-you very much... its not a huge or obvious visible gradation in most shots. If it became intrusive in some way, I'd back off on the offset a little more and drop a little exposure overall but gain uniformity from top to bottom.
Wow, technology moves on. Not only can we get no loss... but we now can get a small boost in light going from maximum sync speeds to super-sync speeds. Again, this is not something that can be done with every camera and strobe combination, but it is what I can get with my equipment. Your results may vary... but I am glad mine don't... lol
April, 2012 - Addendum
I've taken the time to make a small YouTube video that shows how to use one variation of this setup on a Nikon D200 (tested and works on a D300 and D700 as well). This one is done using two PW Plus II transceivers, an SB-800 flash (SB-600 works, but your camera then must have a sync port!) and my Photogenic studio strobe.
Here is the video:
Here is the link if you want to see a bigger or full screen version of it:
The Nikon High Speed Hack Trick Video
Enjoy!


